Jan A. Kylstra, MD | Retina Service, Massachusetts Eye and Ear, Department of Ophthalmology, Harvard Medical School, Boston, Massachusetts J. Daniel Diaz, MD | Retina Service, Massachusetts Eye and Ear, Department of Ophthalmology, Harvard Medical School, Boston, Massachusetts
Purpose
To describe a simple and inexpensive model eye that allows lifelike simulation of indirect ophthalmoscopy and retinal photocoagulation.
Methods
A 60 D examination lens, a bulb syringe, foam poster-board, a manila folder, a hobby knife, a fine pair of scissors, a glue gun, and a 2.5 cm square Optos color fundus photograph printed at 1200 dpi resolution on glossy photographic paper were used to create a model eye.
Results
This model produces a high-quality, inverted, and aerial image that closely simulates clinical indirect ophthalmoscopy. Pupil size and retinal pathology can be easily changed. Binocular indirect laser photocoagulation can also be simulated, because white laser burns will appear on the glossy inkjet photograph.
Conclusions
Binocular indirect ophthalmoscopy and indirect laser photocoagulation are technically challenging diagnostic and therapeutic techniques. This simple and easy-to-build eye model allows for lifelike simulation of indirect ophthalmoscopy and indirect laser retinal photocoagulation.
Binocular indirect ophthalmoscopy and binocular indirect laser retinal photocoagulation are essential skills for diagnosing and managing vitreoretinal diseases. Becoming proficient at these procedures is difficult and requires extensive clinical experience. Most ophthalmology residents teach themselves indirect ophthalmoscopy with minimal supervision simply by practicing on patients. Although they typically learn indirect laser photocoagulation under the supervision of a fellow or attending, this is usually accomplished on patients without real-time feedback, because most indirect laser systems do not have observer scopes or mirrors. Both of these skills could be learned more quickly and more safely if a realistic model eye were available. The purpose of this study is to describe a simple, inexpensive, and easily constructed model eye that allows lifelike simulation of indirect ophthalmoscopy and indirect laser retinal photocoagulation.
The following materials are needed to construct the eye model:
• A small bulb syringe (white is best)
• A hobby knife
• A pair of sharp scissors
• Foam poster board
• A manila folder
• A glue gun
• Hole punch, 3 mm, 6 mm, or 9 mm diameters
• Several pieces of hook-and-loop fastener
• Optos (Dunfermline, UK) wide-angle fundus image printed on glossy paper with inkjet printer at 1200 dpi resolution
• 60 D or 78 D slit-lamp examination lens
Video 1 demonstrates the step-by-step construction of the eye model.
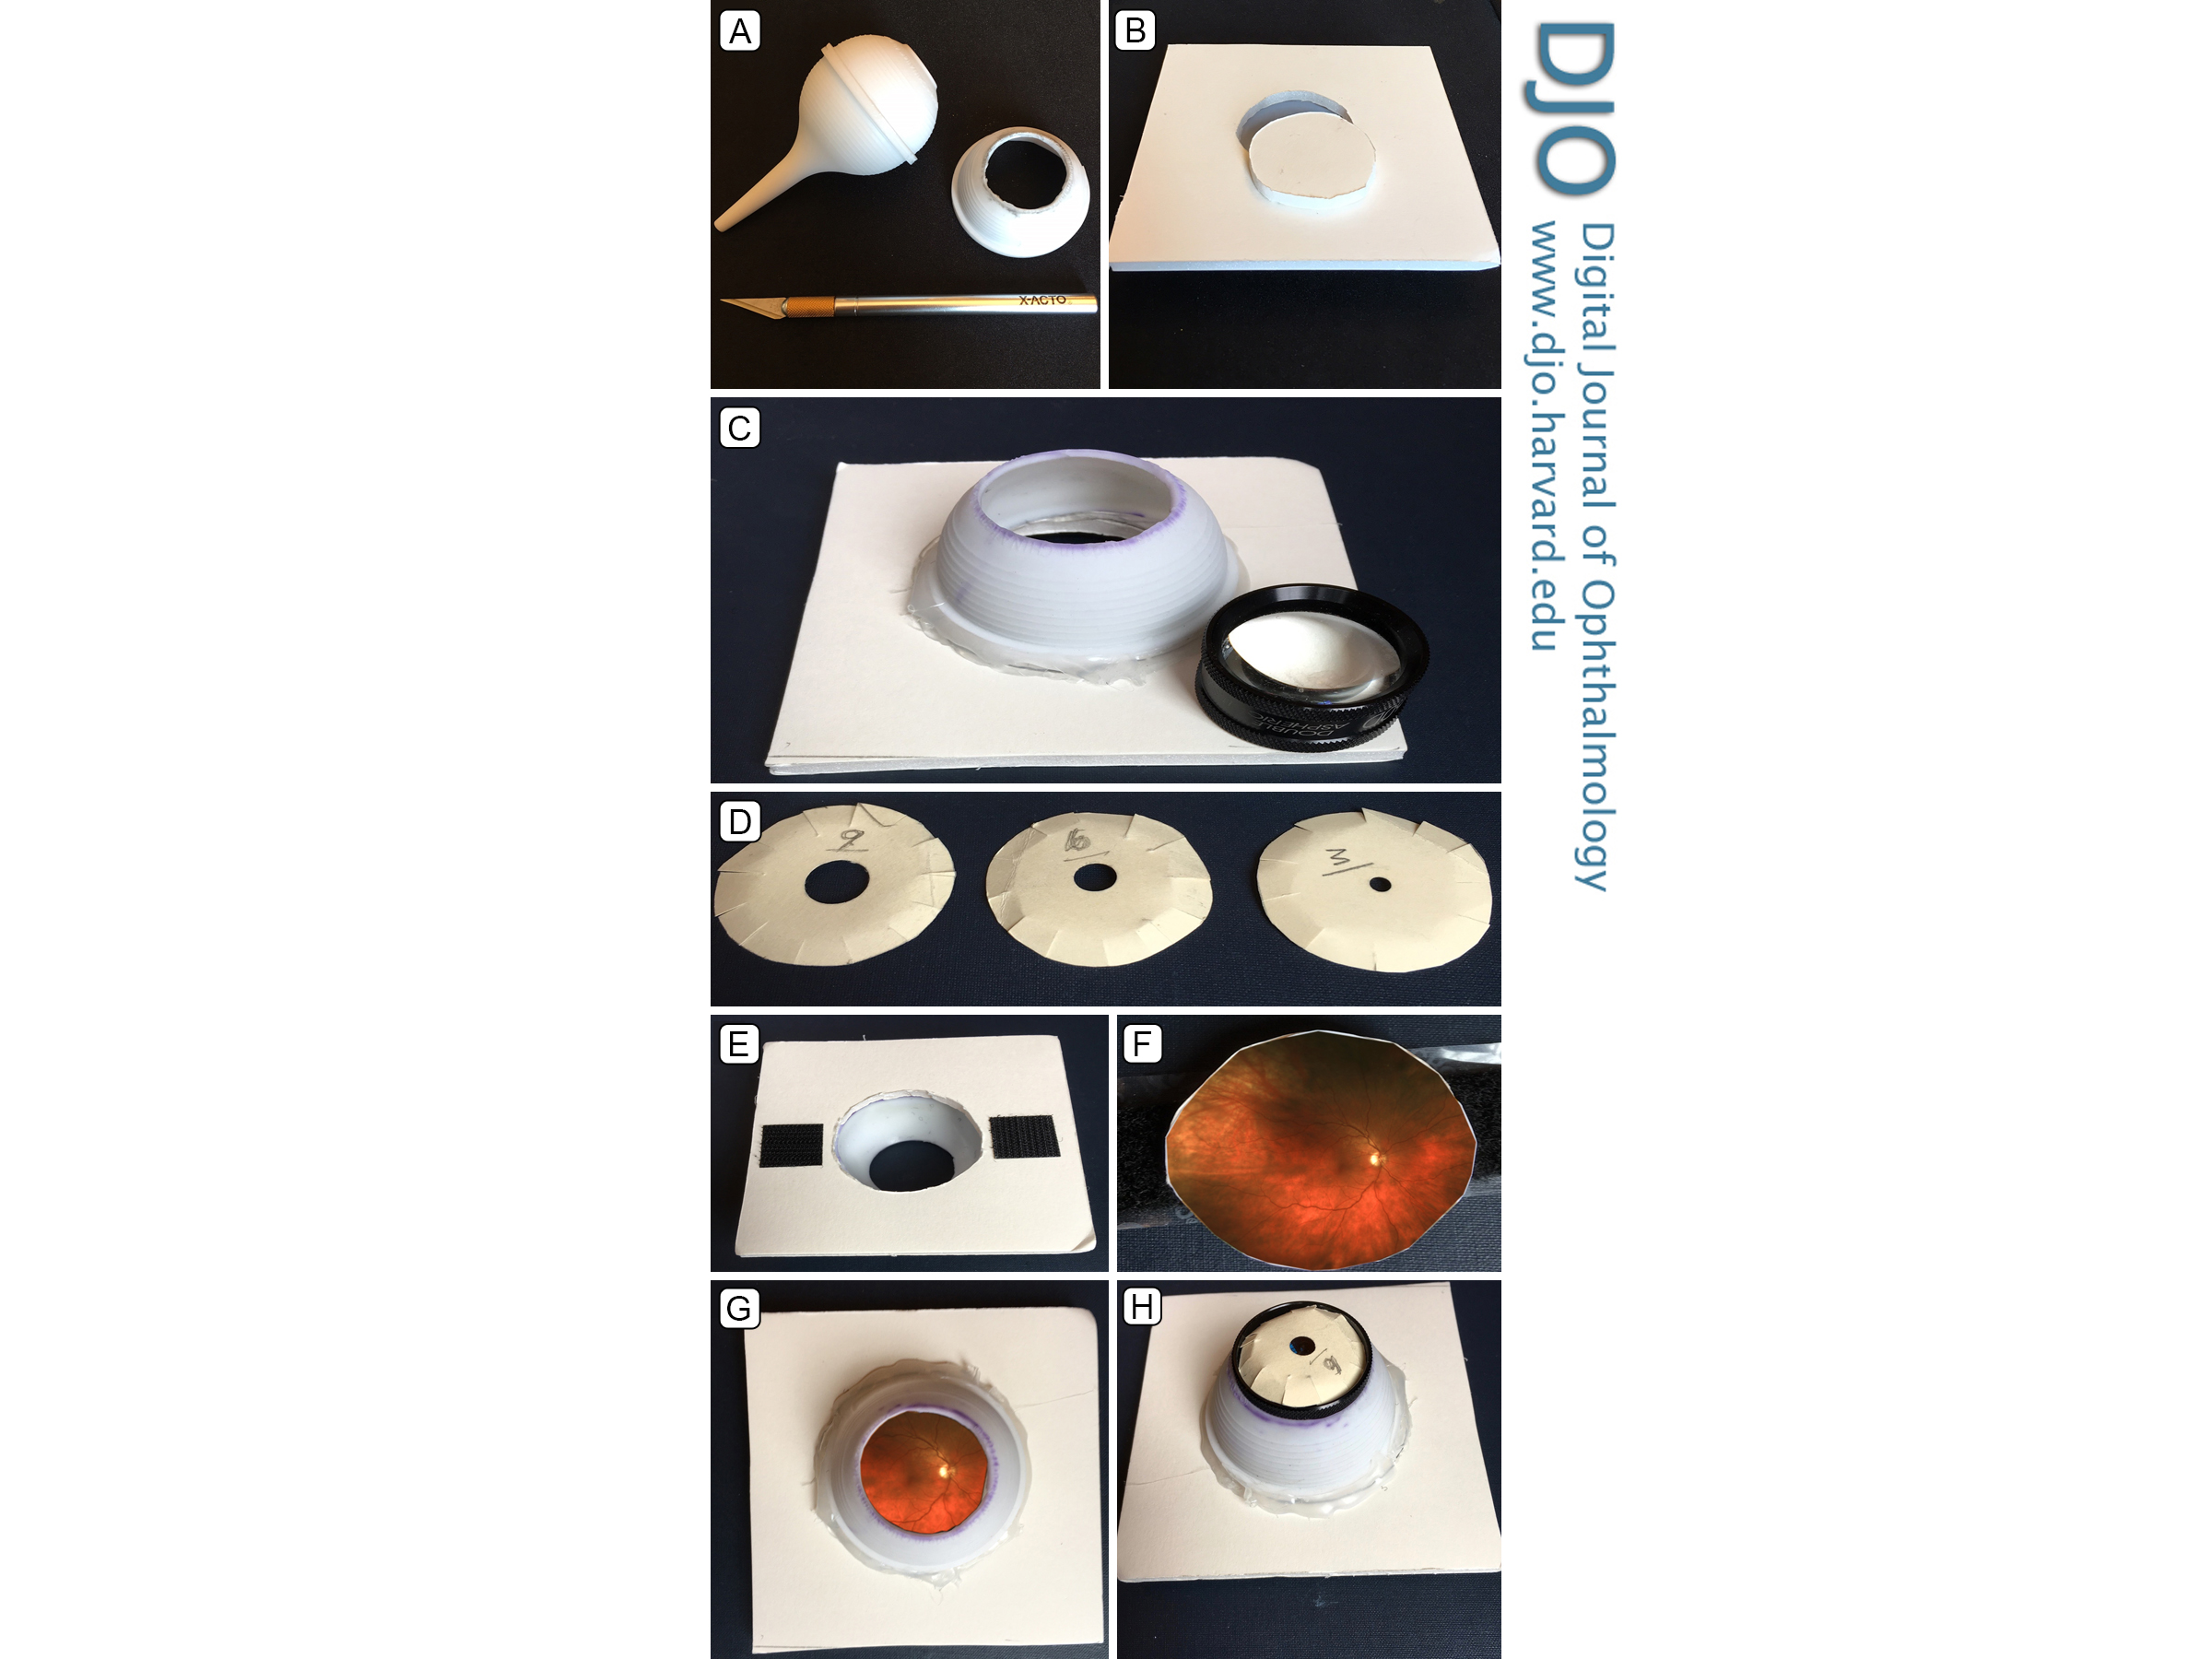
1. Make a circular opening in the top of the bulb syringe, slightly smaller than the diameter of a 60 D slit-lamp examination lens (Figure 1A).
2. Cut a segment off the top of the bulb syringe so that the height of the segment is approximately 4 cm (when using a 60 D lens). The height of the segment depends on the power of the lens used for the model (shorter for a 78 D lens).
3. Prepare the base of the model by using the hobby knife to cut out a roughly 14 × 14 cm square from the foam poster board.
4. Make a circular opening in the center of the square base that is the same size as the inner diameter of the bulb syringe segment. Save the cut-out round piece (Figure 1B).
5. Using a glue gun, attach the bulb segment to the poster board (Figure 1C).
6. Create an iris from a piece of manila folder. It is easier to first create the pupil using a circular hole punch before cutting out the iris, which should be slightly larger than the diameter of the 60 D lens. To better simulate an undilated (3 mm), mid-dilated (6 mm), and fully dilated pupil (9 mm), we created three separate-sized irides (Figure 1D).
7. Make multiple small slits at the edge of the iris and fold them slightly inward so that the iris fits securely within the lens ring.
8. Place two small pieces of fastener to the back of the base. This allows you to securely attach the fundus to the model (Figure 1E).
9. A roughly 2.5 × 2.5 cm square Optos fundus photograph printed on an inkjet printer at 1200 dpi resolution on glossy photographic paper is used to create the model fundus. First trim the photograph to the appropriate size, and then tape it to the circular base created in step 3. A strip of fastener is then attached to the back of the fundus base (Figure 1F).
10. With the fastener in place, the fundus base can now be attached to the poster board (Figure 1G).
11. Insert the 60 D lens into the bulb, followed by the iris of desired diameter (Figure 1H).
This model produces a high-quality, inverted, and aerial image that closely simulates clinical indirect ophthalmoscopy. The model is inexpensive, with the cost of materials (minus the lens) generally under $40. The model is easy to build (first-year ophthalmology residents at Massachusetts Eye and Ear and two medical students constructed their own models in under an hour). The pupil size can be varied. A myriad of retinal pathology can be simulated and easily interchanged. Binocular indirect laser photocoagulation can be simulated, because white laser burns will appear on the glossy inkjet photo (Figure 2). The model can be taped to the headrest of an examination chair for ease of use. In this position, it can be raised or lowered or angled up, down, left, or right as needed (Figure 3).
Binocular indirect ophthalmoscopy and laser photocoagulation are difficult but crucial skills to learn. Many eye models have been described in the literature to facilitate the acquisition of one or both skills. The models, ranging from simple to complex, include an inflatable origami eye,(1) a glass marble,(2) a styrofoam head with slide projector and interchangeable lenses,(3,4) a toy eye with 90 D slit-lamp examination lens,(5) and a sophisticated computer simulation model.(6) The simpler models lack the lifelike image quality and image size found in our model, whereas the computer simulator, although quite realistic, is expensive and does not allow laser simulation.
One of the keys to our model is the use of a 60 D lens as the optical component (which mimics the dioptric power of the human eye). This high-quality lens, or the similar 78 or 66 D lens, is owned by most residents and therefore does not add to the cost of our model. It can be inserted in the model eye for practice and removed for use clinically. Our model, because of its high quality, low price, and ease of construction, may prove useful in helping residents and medical students learn and practice indirect ophthalmoscopy and indirect laser photocoagulation prior to performing these techniques on patients.
1. Miller KE. Origami model for teaching binocular indirect ophthalmoscopy. Retina 2015 35:1711-2.
2. Lewallen S. A simple model for teaching indirect ophthalmoscopy. Br J Ophthalmol 2006;90:1328-9.
3. Colenbrander A. Simulation device for ophthalmoscopy. Am J Ophthalmol 1972 74:738-40.
4. Dodaro NR, Maxwell DP. An Eye for and Eye, A Simplified Model for Teaching. Arch Ophthalmol 1995;113:824-6.
5. Chew C, Gray RH. A model eye to practice indentation during indirect ophthalmoscopy. Eye (Lond) 1993;7:599-600.
6. Leitritz MA, Ziemssen G, Suesskind D, et al. Critical evaluation of the usability of augmented reality ophthalmoscopy for the training of inexperienced examiners. Retina 2014;34:785-91.
 Welcome, please sign in